Create your own Templates
This document describes steps that should be performed to build a custom Subutai template based on the Debian Stretch image using the Subutai Console. Power users or admins may prefer the Create Templates from CLI section below.
In order to be able to create a custom template, you must make sure that you set your PGP key in the User Identity -> Account settings section. The same key must be registered on Bazaar in the User Settings area! Use Subutai E2E browser plugin for this.
To create a custom template, you need to choose a parent template from the list of available templates and create a single container environment from it:
-
In Environment > Environments section select a parent template in the list on the right side bar (in our case it is debian-stretch). Once you click, its icon should be placed on the environment design area.
-
Click "Apply" button and enter a name for your environment, then click the "Build" button.
-
When the environment is built, click on its name in the table below the design area to go to the Environment -> Containers section.
-
You can access the container via Subutai Console by clicking on the container name, or using Control Center. Then you can install the desired software and perform necessary configuration inside the container.
-
Go back to the Environment -> Containers section and select our environment. Its single container shold be displayed. Next to the container under "Options" category select the "Create template" option. A template creation dialog should pop up.
-
In the dialog, you can enter the name of your template and version. Click the "Create" button. The operation will take some time.
- Close the dialog upon template creation, and go to the Environment -> Environments section. You may have to refresh the page to see your template in the templates list. Your templates will show "Own" on a tooltip.
This section describes how to build a custom Subutai template based on the Debian Stretch base image using a command-line interface.
To build new Subutai template you need the following:
1) A Subutai Resource running the latest version of our software;
2) Debian-stretch image imported to the system:
# subutai import debian-stretch
INFO[2016-05-02 12:17:56] [Importing debian-stretch]
INFO[2016-05-02 12:17:56] [Version: 4.0.0, branch: dev]
INFO[2016-05-02 12:17:56] Trying local repo, dial tcp 10.10.10.1:8339: getsockopt: no route to host
INFO[2016-05-02 12:17:57] [Downloading debian-stretch]
 73.09 MB / 73.09 MB [==============================================================] 100.00%
INFO[2016-05-02 12:18:13] [Unpacking template debian-stretch]
INFO[2016-05-02 12:18:15]
[Installing template debian-stretch]
# 1) First of all you need to clone the debian-stretch template to the container with the desired name:
# subutai clone debian-stretch nginx
INFO[2016-05-02 12:22:58] [nginx started]
INFO[2016-05-02 12:22:58] [nginx with ID CEDFD8418B76AB41DC61F14E17C6825041D0A834 successfully cloned]
#
2) Attach the container to execute installation commands inside it:
# subutai attach nginx
(amd64)root@nginx:/#
3) Install desired software into container:*
(amd64)root@nginx:/# apt update; apt install nginx -yDebian Stretch (9.x) uses systemd for service management.
Most of the services installed from Debian repositories provide the correct services that will be started after the container comes up.
But if you need to configure custom service or check that your services are active you will need following commands:
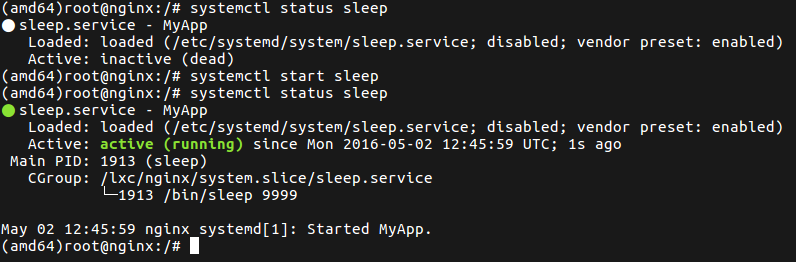
systemctl status nginxshows current status of nginx.service;systemctl start nginxstarts nginx.service;systemctl stop nginxstops nginx.service;systemctl enable nginxenables nginx.service auto start after system boot;systemctl disable nginxdisables nginx.service auto start after system boot.
If you need add custom systemd services to the container which were not included after installing your software, you can add systemd unit files that describe the required services:
Put file with any name with .service suffix like sleep.service to the following directory: /etc/systemd/system/sleep.service
A minimal file should look like this sample:
[Unit]
Description=MyApp

[Service]
ExecStart=/bin/sleep 9999

[Install]
WantedBy=multi-user.target
After these operations you can use systemctl commands to manipulate your service:
To finish template preparation you just need to export your container. You will need a CDN token to do that.
# subutai export nginx -t {cdn-token}
INFO[2016-05-02 12:48:42] [nginx promoted]
INFO[2016-05-02 12:48:45] [nginx exported to /var/snap/subutai/common/lxc/tmpdir/nginx-subutai-template_4.0.0_amd64.tar.gz]
#